

Sometimes, I use affiliate/sponsored links with my recommendations, which if bought through might earn me a few pennies at absolutely no extra cost to you. This helps with the cost of keeping this site alive so I can continue to guide you on your travels. Please remember that I would never ever ever recommend anything I don’t or wouldn’t use myself. Big thanks to each and every one of you who have trusted my recommendations so far! Lozzy x
As the professional photographer in charge of content creation for Cuppa to Copa Travels, I’ve always felt a lot of pressure to produce high quality images of epic places. However, being that the brand started on Instagram as a travel couple account, I was also expected to produce couple travel photos with both Andy and I in them, all cutesy and sweet.
Being in the mood to act like this was an issue in itself, but we could usually come away with a shot we were happy with. I definitely got sucked into the pressures of growing a travel Instagram account, but that’s a story for another time.
After you’ve read this post on how to create couple travel photos with out a tripod, you may also enjoy these other travel photography posts:
- 8 travel photo editing techniques to take your images to the next level
- The 4 best cameras for travel blogging in 2021
- What I pack for travel photography when backpacking
Anyway, I haaaaate the idea of travelling with a cumbersome tripod and having to set up my fairly expensive photography gear 3+ metres away from us and then run around trying to use the 10 second timer. Neither my Canon 6D nor 5D Mark iii have a burst/continuous shooting mode, so it would take us an age to run back and forth until we got the right shot, probably drawing up quite the crowd by then (ew).
So, I developed a way of getting round this, which I found pretty normal as a photographer but am usually met with ABSOLUTE SHOCK when I tell anyone that asks about how I take my couple travel photos. And now that Cuppa to Copa’s gone solo, I feel like I can finally let the gato out of the bag.

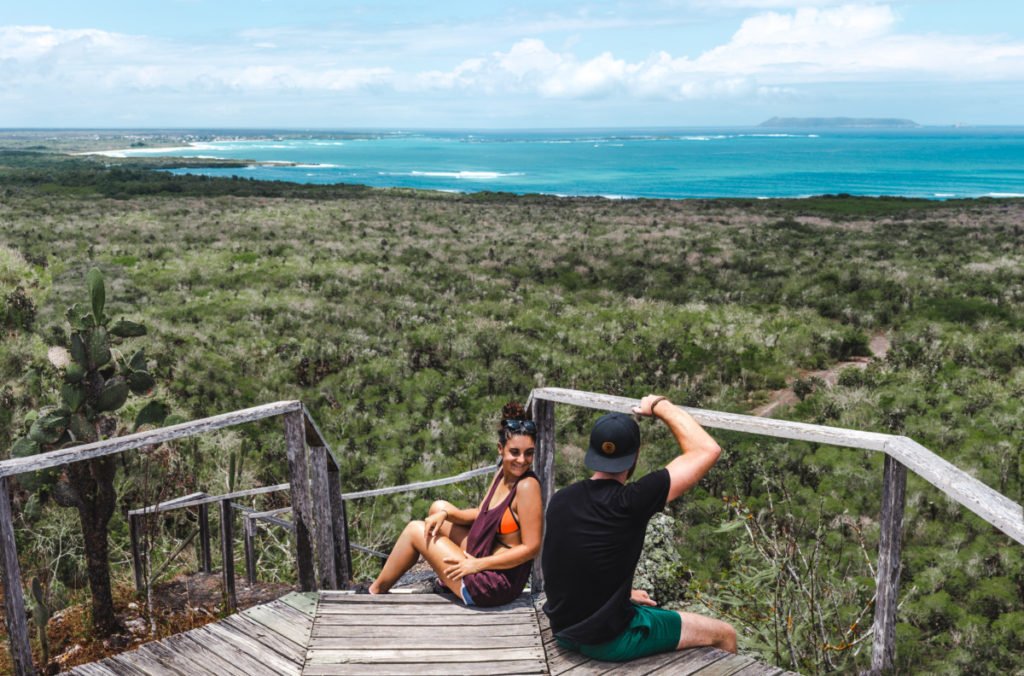
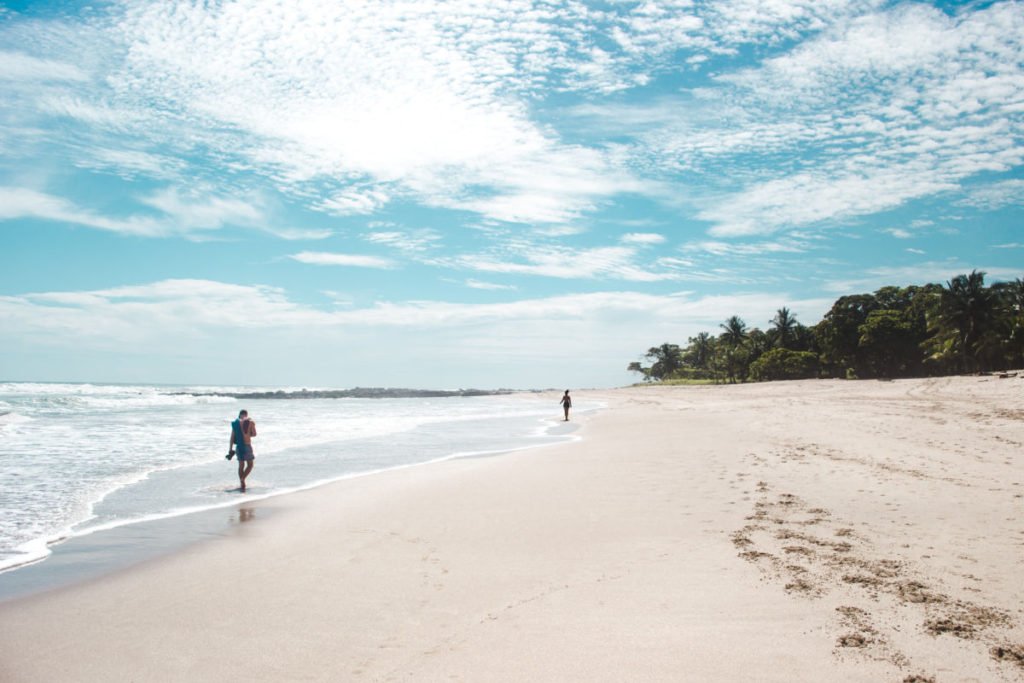
You see… In most of the couple travel photos you see of Andy and I interacting at various beautiful places around Latin America, we were never actually in the same shot together. We both took the photo, and yet neither of us took the photo. Are you starting to see where I’m going with this…?
So what’s the secret to tripod-free couple travel photos?
About 9 months into our 2 years in Latin America, I came to realise that I could avoid the need for a tripod when taking couple travel photos, dodge the gawping onlookers and not have to rely on strangers so that I could make sure my shot is exactly how I wanted it, all by using the composite technique in Adobe Photoshop.
I would take a photo, composing the shot according to my vision, with Andy in it. I’d tell him my idea for the image, and direct him on where he should stand, what he should be doing, and where he should pretend I was. I’d then get him to switch places, taking a photo of me pretending I was next to him. Back home, I would stitch myself into the photo I took of Andy, so that it looked like we were interacting together as a normal travel couple would.
Don’t believe me? Here are the raws and afters of some of my favourite composite masterpieces:
Unfortunately I have to keep the resolution of these photos low so that Google doesn’t penalise me for poor site speed!

This is also interesting for you to see my colour grading and edit style from raw. Don’t freak out that the originals look so dark and lifeless – I prefer to deliberately underexpose my images to avoid losing detail, and the CR2 raw output of a professional camera creates duller images because it’s capturing more information than a JPEG. All my couple travel photos are edited to reflect the reality of the colours that our eyes could see.

This one was particularly creative as we just couldn’t get the background to work for us (spot the other bloggers’ photoshoot in the archway), and the people we convinced to take our photo weren’t quite in line with my compositional vision for Cartagena’s clocktower 😉 I was quite pleased at being able to turn outtakes into an Insta-worthy shot of Getsemaní.

I’m not sure why dancing alone in Mompox’s main plaza feels less embarrassing than dancing together, but…

This shot was created by also using Panoramic merging before the composite, which is easy to do in Lightroom:

Water ripples always add an extra layer of complexity to Photoshop composites of couple travel photos. Keeping Eraser opacity low can help you blend better, or if this isn’t working you’ll have to lasso just the subjects themselves.

How do you create composites in Photoshop?
Now, this composite technique does obviously take a lot longer in post-production, but editing is my favourite part of photography, and I love to push my Photoshop skills to their limit and learn more about what’s possible. Mastering the composite technique really improved my abilities and understanding of the software, lighting and shadows (sometimes I’d have to create my own!).
The steps to do this photoshop technique are simple, but it can take practice to get it looking natural and unmanipulated – both in photoshop and ‘on set’. There are a few ways to go around it, but here is my self-taught process for creating these couple travel photos in Photoshop:
- Open the files for your base photo and the photo to be composited
- Study both carefully; make sure angle, lighting and scale are matched
- In your composite image, select the lasso tool and choose a feather level (0 will give a hard edge; you can get away with higher feathering if you’re including part of the background and want it to blend out. If your subjects are going to be touching in the photo you will need a feather of 0 or 1). There is also a Magic Wand tool to automatically select parts of the image, but I prefer to freehand
- Draw around the composite subject with the lasso tool. Zoom in tight to make sure you’re including all the pixels you need but no extras!
- Copy the lasso selection, and paste it as a new layer into your base photo. Check the edging on your subject; you may need to go back and edit your lasso selection on the composite photo a few times before you perfect it
- In the Move tool’s control panel, tick the ‘Show transform controls’ box, and use the controls to scale and angle your lasso selection to make it look natural
- Use the Burn tool to create any shadows you might need to add. Refer to the composite photo to see where these should be, and don’t forget shadows that may be cast on the other subject by being close!
- If your subjects are touching, you may need to lasso small parts of the base photo and paste them to overlap the composite selection
- Use the Eraser tool (adjusting the hardness, size and opacity as necessary) to clean up and edges that need blending
- Admire your composite image!
Did we fake our couple travel photos?!
So do I feel like we fell into the micro-influencer trap of ‘faking’ our couple travel photos? Actually, no. Both of us were there at that place at the same time, so we’re not lying about our travel experiences. Using editing effects to tell a better story is all just part of the art, if you ask me. And besides, what’s handy now that we’re not together is that Andy and I both have solo photos in all of these beautiful locations across Latin America! Win-win 😉
Does it ruin the magic for you, knowing how these couple travel photos were made? I’d be really interested to know in the comments!
Now you’ve read this post on how to create couple travel photos with out a tripod, you’ll also enjoy these other travel photography posts:
- 8 travel photo editing techniques to take your images to the next level
- The 4 best cameras for travel blogging in 2021
- What I pack for travel photography when backpacking

Liked this post on the Photoshop technique for couple travel photos that always shocks people?
Give it a save on Pinterest so that you can find it again later!

Last Updated on 23 December 2022 by Cuppa to Copa Travels
Wow…mind blown…I always wondered how your photos were created…but it doesn’t take away the magic since you were actually there to create the photos.
Good to hear it doesn’t spoil it for you! 🙂
If we are on a road trip, I still prefer my old good tripod. It just feels better to spend more time in action, than in front of PC editing. But when backpacking, your trick is very useful, I have to admit 🙂 Thanks for sharing!
Very nice post. I just stumbled upon your blog and wished to say that I’ve truly enjoyed surfing around your blog posts.
In any case I will be subscribing to your feed and I hope you write
again soon!
Hello! I’ve been reading your web site for some time now and finally got the bravery to go ahead and give you a shout out from Austin Texas!
Just wanted to tell you keep up the great job!
Great article.
Good information. Lucky me I recently found your blog by chance (stumbleupon).
I’ve saved it for later!